
One common feature to dress up the traditional square drywall corner is the use of bullnose corners, a rounded corner. Bullnose gives the corners a softer look and reduces the need for trim in some instances. However, many homeowners who have this feature have also encountered difficulty after a period of time with the corner bead popping loose and leaving a very unsightly crack near the corner, thus negating the soft look desired which was the reason for using the bullnose in the first place!
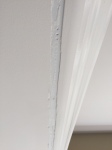
The most common cause of the bullnose corner pulling loose is the way it is installed. Most installations call for a coat of topping compound placed on both corners. After that, the corner bead is simply placed onto the compound and then the corner gets skim-coated like a regular square corner bead. Nails or screws are usually only used at the ends of the bead. The topping compound is responsible for holding the bead in place. Far too often this application ends up looking like the corner pictured.

On one of our recent projects, the homeowner showed us several such corners in their home where the bullnose corners had failed. In one area in the Master Suite, nearly the entire perimeter of the tray ceiling, which featured the bullnose corners, had experienced substantial failure. So along with upgrading the wall color, we would also make the ceiling look brand new again! It was going to be an great transformation.
 1. Our first step was to take a sharp razor knife and cut a line parallel to the existing crack in the drywall. Care must be exercised to stay away from the actual rounded portion of the corner. We tried to keep the new cut about 3/8″ – 1/2″ from the original crack.
 2. Once we had the parallel cut made, we took a putty knife and flipped the joint compound out of the groove we had created. Removing the existing compound exposed the edge of the bullnose bead.
 3. Now that the edge of the bead was exposed, we were able to determine where the bead had broken loose. We secured the bead using drywall screws (drywall nails can also be used).
 4. The next step in the process was to refill the groove with joint compound. This step took more than one application as we were replacing multiple layers of original skim coats. Trying to replace a thick layer can result in cracking of the joint compound. Allow plenty of time for the compound to dry before applying the next coat.
 5. Lastly, we sanded down the compound to a smooth finish, making certain the the groove was flush and full. The process is completed with a brand new coat of paint on the entire ceiling surface. The homeowner can now lay their head on their pillow and look up at a completely refreshed and renewed ceiling with those old cracks just distant memories!
At Final Coat Professional Painting, we not only enjoy helping our clients refresh the look of their home; many times this includes changing wall colors. Sometimes it means keeping the same color scheme but just renewing the paint surface. And occasionally, we get the opportunity to repair a significant issue that cannot be helped with a new coat of paint. We look forward to helping you with your next project!


 the heat and beating rays of the sun to bake these elements onto the surface of the siding. The longer we wait between cleanings, the more possible it is that these stains penetrate the surface and leave permanent, and unsightly, stains.
 blockages and slow working gutters. Leaving them without maintenance allows for the decomposition of the organic material which then solidifies within the gutters and completely stops the flow of water as designed. When this happens, the water runs over the tops of the guttering, carrying with it the stains of the decaying material within. This causes permanent staining on the exterior surfaces of the gutter, usually blackish in color and is quite noticeable.


